Feeds:
Posts
Comments

Posts Tagged ‘quick recipe’

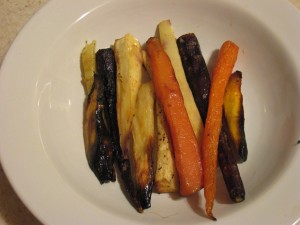
roasted parsnips and carrots

roasted parsnips and carrots

Roasting winter root vegetables is easy, and super sweet and delicious since the vegetables are in season, and cheap because you can buy the root vegetables locally.  Here I have parsnips and different colored carrots, including super sweet blood carrots that have a deep-red, vein-like skin.

Ingredients: extra virgin olive oil, kosher salt, black pepper,various winter root vegetables (parsnips and carrots here)

  1. preheat oven to 400 F.
  2. Peel carrots and parsnips, then cut then into equal-length strips.
  3. toss the carrots and parsnips in a bowl with extra virgin olive oil, kosher salt, black pepper.
  4. spray the bottom of a baking dish with nonstick spray, spread out the root vegetables on the baking dish and bake forabout 30-40 minutes.

Read Full Post »

Annie's organic four-cheese pasta with pancetta, corn, edamame and fried egg

Annie's organic four-cheese pasta with pancetta, corn, edamame and fried egg

I have been living in law school exam hell for the past week and will continue living in it over the next few days.  The exam period has also significantly reduced the food supply in my apartment both due to stress eating and lack of time to go grocery shopping.  So, my dinner for the past few days have been just using whatever I’ve got on hand.  Tonight, I made instant pasta with Annie’s Organic Rotini with Four Cheese Sauce (I should add that as far as instant-mix pasta goes, Annie’s is pretty awesome).  As much as I despise Sandra Lee of Food Network’s Semi-Homade I pulled a semi-homade on this pasta dinner, and created a pseudo-pasta alla carbonara (given the egg and pancetta).  I had 1 leftover corn, I had some leftover pancetta, bag of frozen edamame green beans, tiny block of aged cheddar cheese, 1 lemon, some leftover chives, carton of eggs.  I was watching Food Network earlier this week when Michael Symon made creamed corn with bacon and he made a stock with the corn cobs, so I got the idea to boil my pasta in the same water that I cook the corn in…don’t think it made much of a difference really, since I had ONE ear of corn. Ha! Dinner was created:

Ingredients:  um…not bothering to list this since the whole point is to use whatever you’ve got, basically, any instant pasta mix with cheese sauce plus whatever you think will go wtih it.  The steps below are just what I did tonight:

  1. shuck corn and remove kernels.
  2. In a pot, boil hot water (amount according to package instruction).  When the water’s come to a boil, add corn.
  3. When the water’s come to a boil, add the corn kernels and simmer for about 5 minutes.  Remove using a slotted spoon/strainer.
  4. Return the heat on high and when the water’s come to a boil again, add pasta and cook for a little less than the instructed time (you are going to toss it again with the sauce so you don’t want to over cook it).
  5. While the pasta is cooking, heat medium sauce pan, add olive oil.  Then add diced pancetta and cook over medium heat, browning the pancetta and letting its fat render.  Remove pancetta from pan (but oh leave the good fat in there!)
  6. Drain pasta.
  7. Return the sauce pan (for the pancetta) back on the stove and reduce the heat to low.  Add milk and sauce mix and stir. Add in corn, add frozen edamame.  Add pancetta.
  8. Stir in pasta. Add juice of lemon and lemon zest.
  9. Plate.
  10. In another pan, heat oil over medium heat until hot.  Add 1 egg. Cook for a few minutes until you’ve got a gorgeous sunny-side up.
  11. Serve egg over pasta.  Add more lemon zest, chives and grated cheese for garnish. Salt & pepper to taste.

The lemon was key.  It really helped add another flavor to the pasta and lightened it as well. And oh…break the egg yolk, and let it mix with the pasta (hence the pasta alla carbonara)…Heaven.

annie's organic 4 cheese pasta with pancetta, corn, edamame and an egg to top it all off

quick pasta heaven: annie's organic 4 cheese pasta with pancetta, corn, edamame and an egg to top it all off

Read Full Post »

baked acorn squasy with butter, maple syrup and pecans

baked acorn squash with butter, maple syrup and pecans

I had picked up some beautiful acorn squash earlier and they have been sitting quietly in the box at the corner of my kitchen. Finals have been killing me but I decided to make them one night. I love the comfort foods of winter. I have been craving stew, braised things, baked pasta and endless soup.

Acorn squash is one of those things that are foreign to me, I think I had them for the first time last year as a sample while grocery shopping. They have a mild squash flavor (as far as the squash family goes) and a stringy texture. They go perfect with maple, honey, sage and your other fall/winter flavor profiles. Oh, brown sugar would have been lovely too, but I was afraid it would make it too sweet, with the maple syrup and all.

Baked acorn squash with butter, maple syrup and pecans

Ingredients: acorn squash, butter, maple syrup, chopped pecans, salt

  1. Pre-heat oven to 350 F.
  2. Cut the acorn squash in half lengthwise. Scoop out the seeds and skin the middle, creating a hollow bowl with each half of the squash.
  3. Place the squash, cut-side down, in the baking pan.  Bake for about 30 minutes until they are tender.
  4. Take the squash out of the oven.  Put about 1 tbsp of butter in the “bowl” and brush/spread it all over the flesh of the squash as it melts.
  5. Drizzle maple syrup over squash.  Sprinkle with chopped pecans
  6. Put the squash back in the baking dish. Place it on the top rack of the oven and broil on high for about 3-5 minutes.

I can’t wait for the finals to be over so I can go cook in my kitchen and play with my new kitchen toys!

Read Full Post »
I cooked frozen dumplings in the microwave tonight for dinner.  A lot of people get really grossed out when I tell them I do this. Yes, you can cook Chinese frozen dumplings (NOT the gyoza they sell in Japanese supermarkets that are fully cooked already), but the frozen, raw dumplings…in your average microwave. It is really fast! and easy! And yes, they still come out better when boiled in hot water, but it is a good solution when you’ve used up all your pots, or when you want dinner in a hurry.

I got the recipe from a Taiwanese cook book 用微波爐作菜 or Cooking the Microwave Way.

Steps:

  1. Put frozen dumplings in a bowl.
  2. Fill the bowl with hot water so that they at least half an inch over the dumplings. (By hot water, I mean water with your faucet turned to hottest possible).
  3. Cover the bowl and microwave on high for 3-4 minutes for about 6-7 dumplings. (The original recipe calls for 6 min. on high for 15 dumplings).
  4. You know the dumplings are ready when they are floating in the water.
  5. Serve with seasoning of your choice.

Here is a photo of my dinner tonight:

frozen dumplings cooked in microwave

frozen dumplings cooked in microwave

Read Full Post »

I haven’t had much of a chance to cook lately, which is something that is making me quite unsatisfied — hopefully some of that will be remedied this weekend. All the cooking I have done lately are quick-fixes, made with the help of my beloved Trader Joe’s…

In the produce section of Trader Joe’s you can find these bags of green beans that have been trimmed and washed (if you believe that,..but it’s trader joe’s and I am a fan, so I will lend them my trusting heart). They can also be microwaved right in the bag.  To cook them in the microwave (in the bag), cut a corner of the bag to vent, then microwave the green beans (in the bag, again!) for 3-5 minutes on high. I have a tiny microwave so I did it for 5, but I imagine a more powerful microwave (above 700W) can do it in less time.

I usually microwave the green beans, then carefully pour the now-hot green beans out of the bag into a container, then I drizzle them with EVOO (for those who have not learned Rachel Ray speak, extra-virgin olive oil), coarse salt, and black pepper. Then I lid the container and shake vigorously…and viola!

microwaved green beans with EVOO

microwaved green beans with EVOO

Read Full Post »